Users
In the Users section, you can manage the Users and the User Roles of your online store.
On the Users section you can manage:
Users and
User Role of your online store
1.Users
The Users subsection has a list of the customer data. The list contains the Email, Name, Customer roles, Company Name and Active of each customer.

Fig. 1
On the top right of the Users page, there is a Search bar to filter the list based on the EMAIL of the user.
Edit Customers' Data
To Edit customers' data, click the Edit button. On clicking this button a new page will open. The Edit Customers info page contains the Username, First name, Last name, Email, Is Tax Exempt, Active and Customer Role fields of the user/customer.

Fig. 2 Edit Users
Username ->
First name ->
Last name ->
Email ->
Is Tax exempt ->
Active ->
Customer Role ->
On the bottom right of the page, three buttons are shown.

Fig. 3 Cancel, Save and Save and Continue Edit buttons
By clicking the Cancel button, you discard the new changes and return to the previous page.
By clicking the Save button, you save the new changes and return to the previous page. An ‘Edit Success’ message (as in the picture below) will be displayed on the top right.

Fig. 4 Edit Success popup
By clicking the Save and Continue Edit button, you save the new changes and you can still continue to edit. An ‘Edit Success’ message (as in the picture below) will be displayed on the top right.

Fig 5. Edit Success popup
2.User Roles
The User Roles subsection has a list of the existing roles. The list contains the Name, Free Shipping, Active, and Is system role of each role.

Fig. 6 User Roles
+Add Role
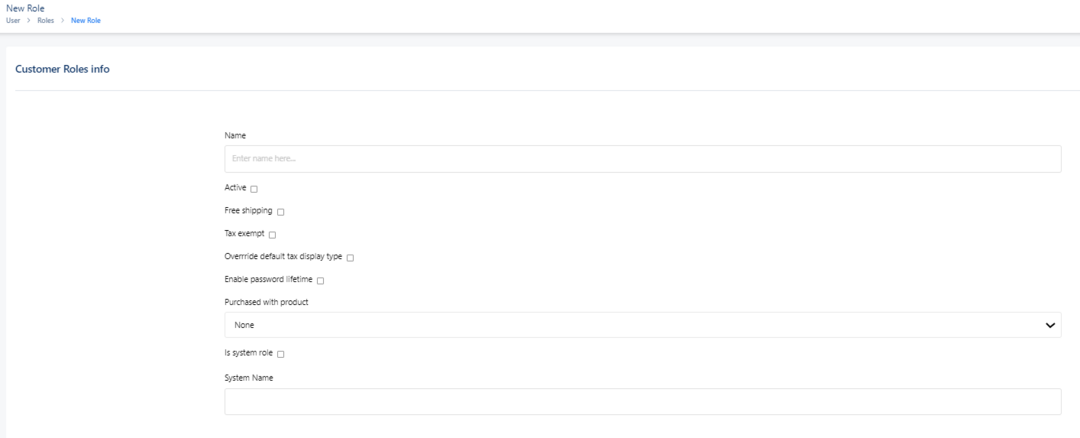
You can create new Roles (only if you have permissions to manage roles) using the +Add role button. When clicking the +Add Role button a new page opens.

Fig. 7 Add a role
You get to fill the Name, Active, Free shipping, Tax exempt, Override default tax display type, Enable password lifetime, Purchased with product, Is system role and System Name fields with the data of the new User Role.
On the bottom right of the page, three buttons are shown.

Fig. 8 Cancel, Save, Save and Continue Edit buttons
By clicking the Cancel button, you discard the new changes and return to the previous page.
By clicking the Save button, you save the new changes and return to the previous page, an ‘Edit Success’ message (as in the picture below) will be displayed on the top right.

Fig. 9 Edit Success popup
By clicking the Save and Continue Edit button, you save the new changes and you can still continue to edit. An ‘Edit Success’ message (as in the picture below) will be displayed on the top right.

Fig. 10 Edit Success popup
Edit Role
To Edit any of the roles, you click on the Edit button. You can Edit the fields that you filled when you added a Role such as the Name, Active, Free shipping, Tax exempt, Override default tax display type, Enable password lifetime, Purchased with product, Is system role and System Name fields.
To save the new changes and continue to edit, click the Save and Continue button
Click Save Changes to save the new changes, Cancel to discard them or Save and Continue to save the new changes and continue to edit.
